| monkey_files.zip |
Animating a monkey walk cycle step 1

So now that you've created two different IK armatures using the Bone tool in Flash, it's time to combine these techniques to create a walk cycle for a cartoon character. The character I have designed for this example is a rather sullen-looking monkey. All of his body parts have been separated into symbols on different layers (see Figure 17).
Animating the Legs
The next step is to determine how to apply your armature. Your first instinct may be to apply a single armature that links all body parts together. But I have found this to be not the best way, because it can make for a very complicated armature and therefore difficult to manipulate. I prefer to create smaller individual armatures limited to just the arms and the legs.
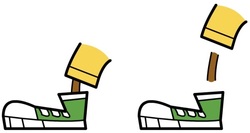
Animating the legs The leg itself is made up of three individual symbols (see Figure 18).
Animating the legs The leg itself is made up of three individual symbols (see Figure 18).
Coverting to Graphic symbols

- Select all three symbols and press F8 (Convert to Symbol) and name it leg_armature. Double-click this symbol to edit it.
- Select the Bone tool (X) and connect these three leg objects, starting with the upper leg symbol as the root bone in the armature. Your completed armature should consist of only two bones and look something like Figure 19.
Constraining the motion
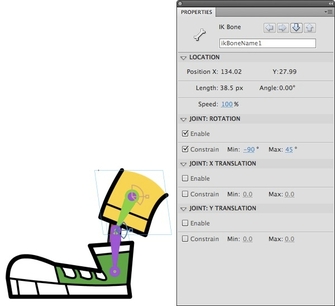
The next step is to constrain the joint rotation of each bone. This will limit the amount of articulation each bone will have and will help avoid anatomically impossible poses.
- Select a bone by clicking it directly. The Properties panel will update and provide pop-up menus for Joint: Rotation and X/Y Translation options.
- In the Joint: Rotation section, select the Constrain option and use the hot text sliders to adjust the amount of rotation needed (see Figure 20).
Controlling Speed
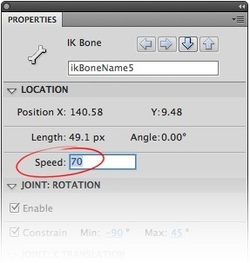
You might want to adjust the speed of the root bone at this time as well. The speed affects how the bone feels when manipulating it. A lower numerical value adds more weight to the bone, making it seem sluggish compared to a bone with a higher numerical value. I like to lower the value of the root bone a little bit because it provides a more natural feel to the entire armature (see Figure 21).
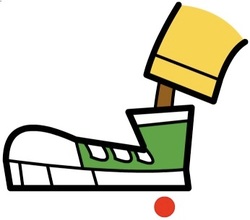
Since three objects require only two bones, the last object in the chain is more difficult to control because it lacks a dedicated bone to which to apply its constraints. A home-grown technique that solves this problem involves adding an extra object to allow for an extra bone in the armature. The object itself can be anything, because ultimately it will not be included in the published SWF file. I prefer to use a small red circle drawn with the Oval tool (O) (see Figure 22).
