Bone Tool Instructions Step 1

- Draw an object on the Stage. For this example, I kept it simple and used the Rectangle tool to create a basic shape.
- Once you are done creating your shape, convert it to a Movie Clip or a Graphic symbol.
- Since you'll need more than one object to create a chain of linked objects, duplicate the symbol by holding down the Alt (Windows) or Option (Mac OS) key and dragging the symbol to a new location. Flash will duplicate the instance every time you click and drag it. Repeat this procedure a few more times to create multiple instances of the same symbol (see Figure 2).
Bone Tool Instructions Step 2

- Decide what will be your parent or root symbol instance in the armature. This is the symbol instance to which you will apply the first bone segment. Then drag to the next symbol instance to link them together. When you release the mouse, a solid bone segment will appear between the symbol instances (see Figure 4).
- Repeat this procedure to link the second symbol instance to the third instance. Continue dragging from one symbol to the next until you have linked all symbol instances with bones (see Figure 5).

Bone Tool Instructions Step 3

- The next step is the fun part. Select the Selection tool from the Tools panel (V) and drag the last bone in your chain. The entire armature can now be manipulated in real time as you drag the last bone around the Stage_
Bone Tool Instructions Step 4
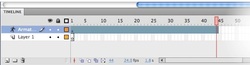
- It's easy to animate your armature by increasing the amount of frames of the IK span by clicking and dragging its edge to the desired frame number (see Figure 7). With the frame indicator on a new frame number, drag your armature to a new position. Flash will insert a keyframe in the current frame number and interpolate the motion within the IK span.

Making A Tail Move

You can also use the Bone tool to create an armature entirely within a vector shape. This is an exciting way to animate shapes like never before in Flash. I use this technique often to produce tail-waving animations for animal characters.
Let's start with a rectangle that's very tall and thin. You could even taper the top end of it using the Subselection tool (A) to simulate the end of a tail (see Figure 8).
Let's start with a rectangle that's very tall and thin. You could even taper the top end of it using the Subselection tool (A) to simulate the end of a tail (see Figure 8).
Animating a tail

Select the Bone tool (X). Starting at the bottom (base) of the tail, click and drag upward inside the shape to create the root bone (see Figure 9). Flash will convert the shape to an IK shape object as soon as the first bone is drawn inside of it.
Animating Tail Step 3

Continue creating bones moving upward, one after the other, so that they connect with one another from head to tail. I recommend that each bone gradually decrease in length so that articulation gradually increases towards the tip of the tail. This will allow for anatomically realistic motion. When you are done adding bones to the tail, it should look something like Figure 10.
